安装rsyslog, 请跳转:安装rsyslog
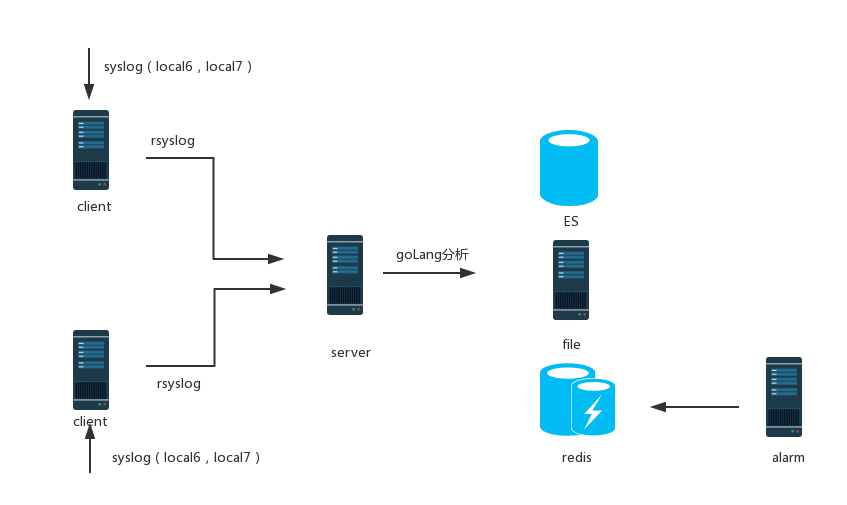
整体部署如图所示:

配置client日志收集到本地
在/etc/rsyslog.conf中添加一行
*.* /tmp/rsyslog.log
注释一行
#$IncludeConfig /etc/rsyslog.d/*.conf
配置日志收集到本地样例
检验配置文件正确性
rsyslogd -f /etc/rsyslog.conf -N1
查看错误信息
tail -n 100 /var/log/messages
重启rsyslog
/etc/init.d/rsyslog restart
测试写入rsyslog日志脚本(位置在/data1/htdocs/rsyslog_input.php)
<?php
    $message='this is test';
    openlog('this is test, do you know', LOG_ODELAY, LOG_LOCAL7);
    syslog(LOG_DEBUG, $message);
    closelog();
或者在终端运行(local7指定运行级别)
#-p 指定自定义的日志设备,和配置文件的local5.*对应
logger -it error  -p local5.info "hello world"
测试
运行脚本(/usr/local/php/bin/php为你php的命令路径)
/usr/local/php/bin/php /data1/htdocs/rsyslog_input.php
安装php环境,请跳转:安装php运行环境
查看结果
在/tmp/rsyslog.log中查看,会有我们记录的内容
client传输日志到server
在/etc/rsyslog.conf文件中删除一行
*.* /tmp/rsyslog.log
在/etc/rsyslog.conf文件中添加一行
$IncludeConfig /etc/rsyslog.d/*.conf
在/etc/rsyslog.d/添加文件client.conf
需要注意的是target是你的server的地址,配置client传输日志到server文件样例
if ($syslogfacility-text == 'local6') or ($syslogfacility-text == 'local7') or ($syslogtag == 'php:') or ($msg startswith 'PHP') then {
        action(type="omfwd"
                        target="192.168.1.12" port="514" protocol="tcp"
                        queue.type="linkedList"
                        queue.spoolDirectory="/var/spool/rsyslog"
                        queue.fileName="fwd_rsyslog.com"
                        queue.maxDiskSpace="5g"
                        queue.saveOnShutdown="on"
                        action.resumeRetryCount="-1"
              )
                ~
}
按照上述’配置client日志收集到本地’的步骤,配置好server服务器,如果接收到日志说明没有问题,如果有问题,请用tcpdump查看错误原因
配置server日志交给脚本处理
编辑日志处理脚本,/data1/htdocs/rsyslog.php
<?php
while(!feof(STDIN)){
        $line = trim(fgets(STDIN));
        if (empty($line)) {
                continue;
        }

        file_put_contents('/tmp/rsyslog2.log', $line, FILE_APPEND);
}
在/etc/rsyslog.conf文件中删除一行
*.* /tmp/rsyslog.log
在/etc/rsyslog.conf文件中添加一行
$IncludeConfig /etc/rsyslog.d/*.conf
在/etc/rsyslog.d/添加文件server.conf,server收集日志交给脚本处理配置文件样例
module(load="omprog")

template(name="log" type="string" string="%fromhost-ip% %syslogtag% %msg%\n")

*.* action(type="omprog" binary="/usr/local/php/bin/php /data1/htdocs/rsyslog.php" template="log")
*.* ~
重启rsyslog
/etc/init.d/rsyslog restart
在client端写入日志
/usr/local/php/bin/php /data1/htdocs/rsyslog_input.php
在server端查看/tmp/rsyslog2.log的内容,如果有内容写入则整体架构搭建完成,可根据自己的需求去编写日志分析脚本
将nginx日志接入rsyslog(nginx主动推送)
男性交友网站有一个nginx的补丁包,nginx_syslog_patch
下载包(注意是整个包,不是一个patch的文件)
git clone https://github.com/splitice/nginx_syslog_patch
进入到nginx的安装目录,然后进行patch
cd /usr/local/nginx-1.4.7 && patch -p1 < /usr/local/nginx_syslog_patch/syslog_1.4.0.patch
./configure --add-module=/usr/local/nginx_syslog_patch/ --prefix=/usr/local/nginx && make && make install
修改配置文件
worker_processes  1;
#syslog logcal6 nginx这个很重要哦,只写一次就可以,当然也要看你放在哪里了
syslog local6 nginx;
events {
        worker_connections  1024;
}
http {
    include       mime.types;
    default_type  application/octet-stream;

    log_format  main  '$remote_addr - $remote_user [$time_local] $request '
        '"$status" $body_bytes_sent "$http_referer" '
        '"$http_user_agent" "$http_x_forwarded_for"';
    server {
        listen       80;
        server_name  localhost;
        #send the log to syslog and file.
        access_log  syslog:notice|logs/kinggoo.access.log main;
         error_log syslog:notice|logs/kinggoo.error.log;

        location / {
            root   html;
            index  index.html index.htm;
        }
    }
    server {
        listen       80;
        server_name  www.example.com;

        access_log  syslog:warn|logs/host2.access.log main;
        error_log syslog:warn|logs/host2.error.log;

        location / {
            root   html;
            index  index.html index.htm;
        }
    }
    server {
        listen       80;
        server_name  www.test.com;

        #send the log just to syslog.
        access_log  syslog:error main;
        error_log syslog:error;

        location / {
            root   html;
            index  index.html index.htm;
        }
    }
}
重启nginx
/usr/local/nginx/sbin/nginx -s reload
最好是对client和server的rsyslog都进行重启(理论上是可以忽略的)
访问client的web,查看rsyslog(这里也就是/tmp/rsyslog2.log)中是否记录了nginx的日志
将php日志写入rsyslog
修改配置文件(此处的位置是/usr/local/php/etc/php.ini或者通过php -i | grep php.ini查询)
打开error_log = syslog这一行的注释,没有就添加吧
重启php-fpm
killall php-fpm && /usr/local/php/sbin/php-fpm
测试(故意写了语法错误)
php -r "echo 11"
查看server的/tmp/rsyslog2.log中是否存在日志
拉取nginx日志
添加/etc/rsyslog.d/nginx-biglog.conf文件
$ModLoad imfile
$InputFilePollInterval 10
$WorkDirectory /var/spool/rsyslog
$PrivDropToGroup adm

## Nginx访问日志文件路径,根据实际情况修改:
$InputFileName /usr/local/nginx/logs/access.log
$InputFileTag nginx-access:
$InputFileStateFile stat-nginx-access
$InputFileSeverity info
$InputFilePersistStateInterval 25000
$InputRunFileMonitor

## Nginx错误日志文件路径,根据实际情况修改:
$InputFileName /usr/local/nginx/logs/error.log
$InputFileTag nginx-error:
$InputFileStateFile stat-nginx-error
$InputFileSeverity error
$InputFilePersistStateInterval 25000
$InputRunFileMonitor

## 指定日志格式模板:
$template BiglogFormatNginx,"%msg%\n"

## 注意syslog日志服务器接收地址,根据实际情况修改:
if $programname == 'nginx-access' then @10.x.x.x:514;BiglogFormatNginx
if $programname == 'nginx-access' then ~
if $programname == 'nginx-error' then @10.x.x.x:514;BiglogFormatNginx
if $programname == 'nginx-error' then ~

